Optimizing Aureola: Automatically Deliver JPG & PNG as WEBP

After I already activated the gzip compression under Nginx in the last article and could save a few kilobytes with it, I dedicate myself to the biggest issue in this article: the images. I will show you how to use the image format webp to compress your image data drastically.
What Happened So Far

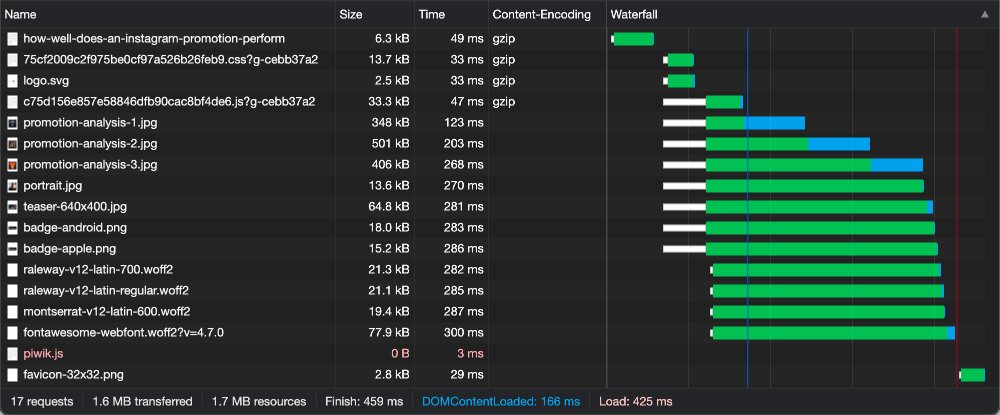
First, let's take a look at where we were left last time. The download size is now 866 kb and 1.6 MB. The response time increased slightly to 359 ms and 459 ms. Most of the download size is due to the images embedded in the articles. Currently they are delivered as jpg and png. But there is another format that offers much better compression options: webp.
Meet WEBP
Webp is an image format developed by Google. It offers the possibility to compress images lossless, but also lossy. According to Google's own advertising, the webp images are up to 34% smaller (26% with lossless compression) than comparable formats. Browser support is now relatively good, but a fallback should still be considered.
Google provides some tools for the conversion. However, if you don't feel comfortable with the command line, you can also use online tools or other software. I chose cwebp because I want to integrate the tool into my deployment process.
The installation can be done easily through apt under Ubuntu:
$ apt update
$ apt install webp -y
Afterwards the tool cwebp is available via the command line. Without defining any significant settings, you can start the conversion like this:
$ cwebp path/to/source.jpg -o path/to/target.webpBy default, a lossy compression with a quality setting of 75% is used. If you place the original and the converted image next to each other as an example, you will notice that some artifacts occur and the quality decreases. What is tolerable depends on the individual case. In my rather text-heavy blog, images are mainly used for illustration. So the loss of quality is (as of now) tolerable for me. The type and quality of compression is of course completely adjustable.

Automatically Deliver Webp with Nginx
As mentioned in the previous article, I run a Nginx server. We can use it to automatically serve webp files if the browser supports this, and if there is a webp alternative for a file. Of course you can also just embed webp images instead of jpg or png into your page. But this of course excludes browsers that don't support them explicitly.
With Nginx we first check if the browser supports webp at all. For this we create a config files /etc/nginx/conf.d/webp.conf with the following content:
map $http_accept $webp_suffix {
    default   "";
    "~*webp"  ".webp";
}
We test here whether the browser has sent an accept header for webp and use it to set a variable named $webp_suffix to the value .webp. If this is not the case, an empty string is defined as default. We need this variable to redirect requests from image files automatically.
For this redirection we need only a few lines in your page configuration. For the sake of simplicity, we do this again in the form of a snippet /etc/nginx/snippets/webp.conf:
location ~* ^.+\.(jpe?g|png)$ {
   add_header Vary Accept;
   try_files $uri$webp_suffix $uri =404;
}
Translated the configuration means: If the target path contains the extension jpg, jpeg or png, try to deliver files (try_files). Either the original url with the $webp_suffix or just the original file. If none of the files are found, return a 404 error. So for a path/to/source.jpg file, it will first try to deliver path/to/source.jpg.webp. If the $webp_suffix is just an empty string, $uri$webp_suffix and $uri are the same. So the original file is simply delivered.
We simply include this snippet in the site configuration under /etc/nginx/sites-available:
server {
  ...
  include /etc/nginx/snippets/webp.conf;
  ...
}
Then we check the configuration and reload the Nginx service:
$ nginx -t
$ service nginx reload
Now webp files are already delivered automatically, if they exist. Please note the naming rule here: For a file source.jpg, there must be a file source.jpg.webp.
Automation
Now of course I could convert each file individually. But to be honest I am way too lazy for that. Instead, it's much easier to do this with a small bash script:
images=$(find your/images/folder -type f \( -iname "*.jpg" -o -iname "*.png" \))
for source in $images; do
  target="$source.webp"
  if [ ! -f $target ]; then
    echo "Processing $source..."
    cwebp -quiet $source -o $target
  fi
done
The script searches in the folder your/images/folder for files with the extensions jpg or png. Then, for each file, it checks if there is already an equivalent with webp extension. If not, cwebp is used to create a compressed variant. I use this for example within my deployment script. You can use this in a crontab for example, or trigger it by hand if needed.
Result with Webp Images
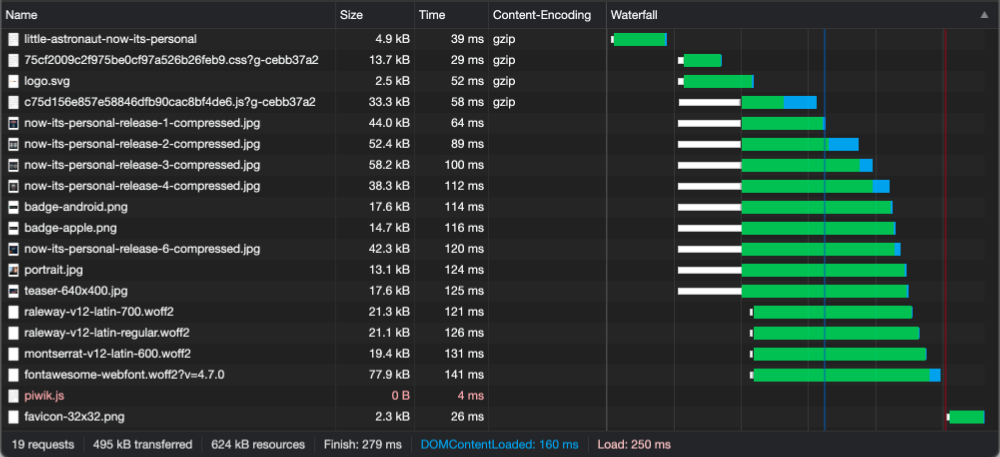

The savings here are huge. From 866 kb and 1.6 MB, the download size is reduced to 495 kb and 375 kb. The response times are reduced from 359 ms and 459 ms to 279 ms and 265 ms. And what's especially nice about this is that nothing at all had to be changed in the CMS, or the existing images to achieve this. Instead, the conversion and delivery via Nginx happens silently in the background. This already is a success, but it can be even better. In the next article I will deal with the optimization of the icon font.
There are no comments yet.